1. Content Template
- Description: This is the message that will be displayed in the popup notification. Use shortcodes to create a personalized message for your customers. Make sure to format the content carefully, as certain HTML tags may break the popup.
Example: Someone from {city}, {country} recently purchased {product_name}
- Warning: Do not use HTML tags that can affect the popup’s structure, as this may prevent it from displaying. You can use simple tags like
<b>for bold and<i>for italics. - Allowed Tags:
<b>for bold<i>for italics
- Note: This field cannot be left empty. Make sure to include the necessary shortcodes to make the popup engaging and informative.
2. Footer Text
- Description: This field serves as the link for the “Don’t Show Again” option. When a customer clicks on this link, a browser cookie is set, preventing any further notifications from appearing to that customer.
- Note: If you wish to disable this feature, leave this field empty.
3. Orders Period [in Days]
- Description: Specify the time frame for fetching recent orders, measured in days from the current date. For example, if you set this to 90, the module will pull orders from the last 90 days at random.
- Note: This field must not be left empty.
4. Order Statuses
- Description: Use this setting to filter the orders displayed in notifications based on selected order statuses (e.g., completed, pending). This ensures that only relevant orders are shown.
- Note: This field is mandatory and cannot be left empty.
5. Image Dimension
- Description: Define the dimensions for the product image that appears in the notification popup. This will ensure that your images are displayed correctly and attractively.
- Note: This field cannot be left empty.
6. Only Show Products from Categories
- Description: If you want to limit notifications to products from specific categories, enter those category IDs here. If you wish to display products from all categories, leave this field empty.
- Note: This is an optional field.
7. Block Style
- Description: Choose from predefined styles (success, warning, info, danger) that work with Bootstrap templates like the default OpenCart template. If these styles are not suitable for your template, select the User option for a customizable style.
- Note: Custom styles may not work on all templates.
8. Color
- Description: This option is applicable only if you have selected the User block style. Customize the color of the notification popup to match your store’s branding.
9. Display Duration
- Description: Specify how long the notification will be displayed before it fades away or exits automatically.
- Note: This field must not be left empty.
10. Delay Duration
- Description: Set the duration between successive notifications. This controls how often new notifications will appear to customers.
- Note: This field cannot be left empty.
11. Placement
- Description: Choose the position of the notification popup (top or bottom of the screen) based on your preference and store layout.
12. Animation
- Description: Select the animation effects for how the notification enters and exits the screen. Choose from various available animations to enhance visual appeal.
13. Show Progress Bar
- Description: Enable or disable a progress bar that visually indicates the time remaining before the notification disappears.
14. Z Index
- Description: This sets the stacking order of the notification. The default value is 1031. It is recommended not to change this value unless you are familiar with CSS and understand its implications.
15. Custom CSS Style
- Description: If you want to add additional custom CSS to style the notification further, you can do so in this field. This allows for deeper customization beyond the available options.
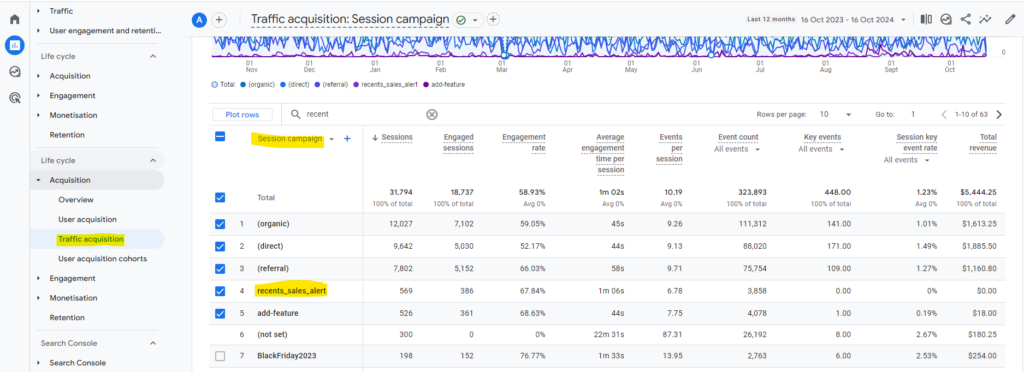
16. Tracking Parameters
- Description: Utilize this setting to track analytics when a customer clicks on the notification. This helps you gauge engagement and effectiveness.
- Analytics View Instructions:
- Log in to your Google Analytics account.
- Click on Reports in the left navigation bar.
- In the sidebar, navigate to Acquisition > Traffic Acquisition to view your campaigns and analytics.
